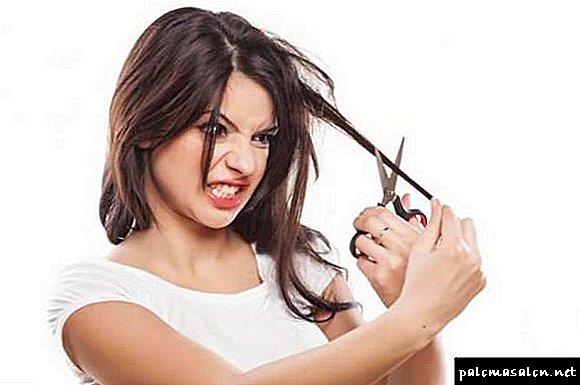
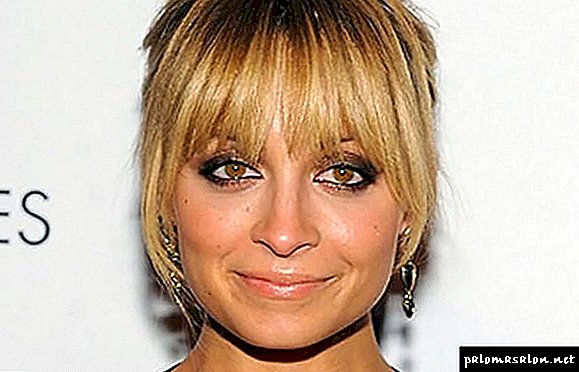
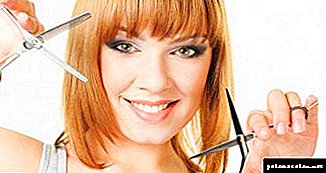
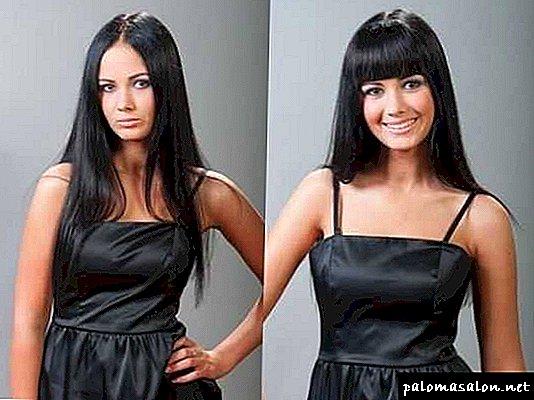
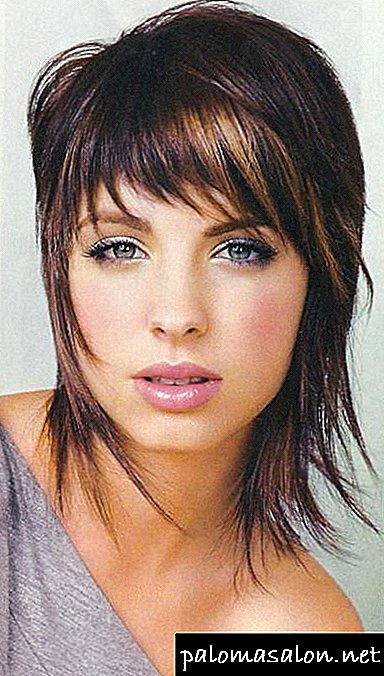
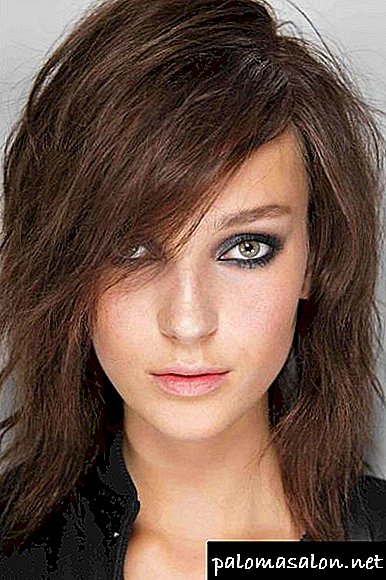
 If you want to change the appearance - cut the bangs! Properly trimmed fashion bangs as much as possible changes the image. A simulated face trim can give a special color, mystery, lightness, playfulness or flirtatiousness, a classic touch or a touch of creativity. If you do not want to go to the hairdresser, you should learn certain rules on how to cut your own bangs.
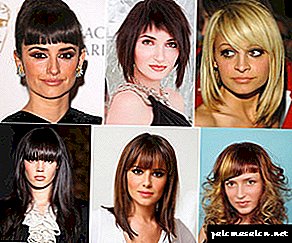
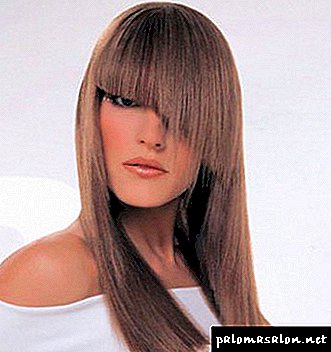
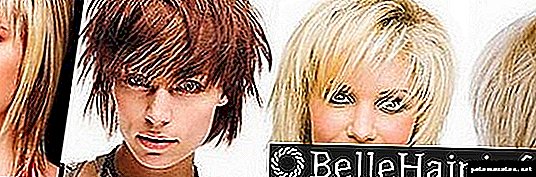
Kinds of bangs
There are many options for how to smoothly cut the bang itself. This part of the hairstyle andIt has various characteristics and can be:
 long
long- short
- rare
- thick
- torn
- two-tier
- bent out
- bent inward
- smooth
- lush.
 long
longThe final form of bangs gives the contour line - edging. It can also be different: oblique, straight, triangular, oval, wavy, stepped, curly, etc.
Selection rules
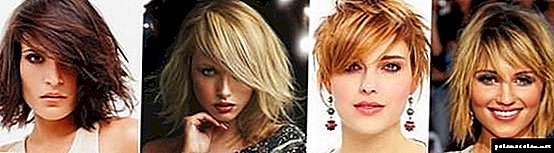
To look fashionable and beautiful, it is important to choose the right version of the haircut. It is necessary to take into account the type of hair, features and shape of the face.
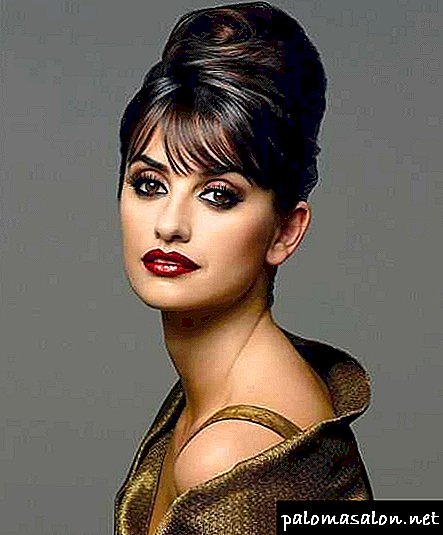
 In the presence of round face shape you can afford any model, even a long and thick bang. A short framing of the face will make the girl more flirty and young. To make the image more romantic and feminine, it is better to dwell on the variant of medium length to the middle of the forehead. Visually narrower will make the face an asymmetrical fringe with a slanting edging.
- Those who have a face square shape, should be softened angular features. Asymmetrical models look original, efficient and bright. They visually stretch the face and give elegance. The main taboos are thick and heavy bangs.
- Face Owners oval shape have not very rich choice. A more refined and stylish looks graduated model. A special charm will add to the image of torn, uneven strands, and long and smooth bangs will make her owner charming and mysterious.
- Girls with triangular face shape fit a long (eyebrow) fringe. In this case, the strands should be quite thick. If the facial features are miniature, the right choice is a shortened version, just above the forehead, with profiled tips.
- Women with high cheekbones and narrow chin can hide this contrast, choosing the right haircut. The best option would be a rare bang with a length slightly below the middle of the forehead.
- If the girl's hair is sparse, curly and thin, you can make a deep, starting from the top of the bang, which ends above the eyes. This model will give the hair volume, if you lay it with a round brush and hair dryer.
 In the presence of round face shape you can afford any model, even a long and thick bang. A short framing of the face will make the girl more flirty and young. To make the image more romantic and feminine, it is better to dwell on the variant of medium length to the middle of the forehead. Visually narrower will make the face an asymmetrical fringe with a slanting edging.
Fundamental rules
Cut bangs should be subject to certain rules. Ignoring them, you can not only spoil your hair, but also make the appearance of the flaws more noticeable. To get a good result, you need:
- If you are framing a face for the first time, it is better to give preference to the flat or oblique option,
- The scissors should be sharp and big
- The first thing to do is to separate the fringe from the rest of the strands,
- In order to give lightness and airiness to thick hair, filillings are performed,
- Hair should be a little wet. If you cut without water, your hair will be uneven, especially if it is curly or wavy. Wet strands shortened after drying.
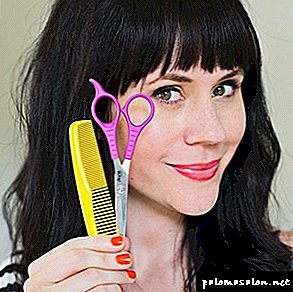
Cutting technology and tools
When trimming a bang for the first time, make it a little longer than planned. If the haircut does not have to like, you can remove the hair in her hair.
The technology is pretty simple haircut:
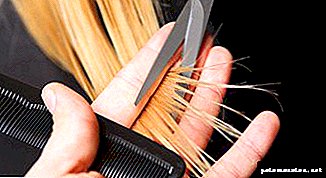
 comb your hair carefully
- pinch between middle and index fingers,
- pull it up or towards the nose
- cut it off.
 comb your hair carefully
If a shortened model is chosen, the hair is cut off over the bridge of the nose, the long one is slightly lower.
Straight haircut
Choosing a flat, straight bang, you should know that it will need to be constantly updated. This procedure is not particularly difficult, and it can be done independently.
Instruction:
- The first thing to do is to take care of bright light.
- Make a triangular parting, securing the remaining strands with hairpins or special clips.
- Comb bangs, dividing it into the same 3 strands.
- Take the center strand and pinch it between your fingers. Then pull, lift and shave too much. In order for the bangs to turn out even, scissors should be held obliquely at an angle of 45 degrees.
- The left and right strands are equated to the central.
- The right strand is divided into 2 layers, the lower one is equal in the central strand, the upper one is made slightly longer.
- The same procedure is repeated for the left strand. Thus it turns out bangs with tips inside.
How to cut a slanting bang yourself
Before you make a slanting bang at home, in addition to sharp ordinary and thinning shears, you will need to purchase a clamping line, with its help you can simulate any styling and arrange exactly the strands.
With such a device does not even need a scheme, you can adjust the thickness and set the desired angle of inclination.
The ruler can be easily fixed on the hair of any hardness. There is a level on it that helps to find the best angle of inclination.
Using this simple device, you can perform such operations with hair as: trim the bang, beautifully graduate the tips of the hair, make the volume at the crown, etc.
One length
This model does not have a clear edging and is most suitable for curly thin hair.
Haircut is divided into the following stages:
- Hair moisturize
- Parting and removing the remaining strands in the tail,
- Having separated the first curl, cut it to the required length. This curl will be the control, and it will have to be guided,
- Separate the next curl no more than one centimeter wide,
- Take two strands, raise them perpendicular to the head and make a cut on the control,
- Gradually continuing to separate the curls, shear them, focusing on the length of the previous ones. You can use one of two methods of cutting - straight or teeth.
- Combing and adjusting the contour line
- Strands, if desired, can be profiled.
Haircut with thinning
Torn edging looks easy, a bit careless and airy. WITHThe trizhka with the filming method is done in the following way:
- allocate strands, removing and securing unnecessary,
- hair is divided into three parts and slightly moisturized,
- the middle strand is taken with the fingers of the left hand, they stretch and cut off the extra length,
- grab the following strands of hair along with the trimmed and cut, equaling them,
- shorn hair is divided into 6−9 parts
- each strand is twisted with a flagellum and made torn cuts with thinning shears near the end and in the middle.
Torn with edging
This model is very popular, and to make it, you will need to perform the following steps:
- Make a parting in the shape of a triangle or rectangle. The rest of the hair to collect in the tail.
- The tips of the scissors deepen into a fringe, cutting off its large and fine teeth. For thick strands need large teeth, for rare - small ones. It is important to remember about the length and take into account that after drying the strands will jump a little.
- The contour may be oblique, straight and wavy. The teeth are made across the entire width.
- Hair mills, comb, equate and make styling.
Ripped haircut without edging
 To make a deep parting of the rectangular or triangular shape, to moisten hair. Remove the remaining strands in the tail.
- Comb the strands carefully and, deep in the bangs with the tips of the scissors, cut the teeth into the desired length. Cuttings can be done at different levels.
- The teeth are sheared across the width.
- Bangs are divided into vertical curls.
- Separate the vertical strand, comb it and lift it at an angle of 90 degrees. Squeeze her middle and index fingers. From the tips of the hair is formed something like a triangle, which is cut off.
- The procedure is repeated for all strands.
- Milled and adjusted.
- Dried and laid.
 To make a deep parting of the rectangular or triangular shape, to moisten hair. Remove the remaining strands in the tail.
Bangs semicircle
For such a haircut, it is necessary to strictly observe symmetry. The edging should look like a neat semicircle.
- Using clips, separate the necessary strands from the rest of the hair.
- Moisten a little hairstyle with a spray.
- Select the control strand in the middle and, holding his fingers, cut it off.
- Moving gradually towards the sides, increase the length of the strands in such a way that a semicircle is obtained.
- Dry strands and comb them, checking the smoothness of the edging.
- If necessary, correct.
Duplex option
An interesting and original image will help create a bang, consisting of two levels. It looks quite unusual, the upper layer is slightly longer than the lower one. To create it, you need:
- Make a triangular or rectangular parting and moisten the strands. Remove the remaining hair, so as not to interfere.
- Bangs divided into three horizontal levels.
- Begin to work from the bottom.
- Take a thin curl and cut it off at the level of the middle of the forehead. This strand will be the control.
- Trimming cut, focusing on the control.
- The second layer of hair combed on the face, trimming on the first.
- The third layer is released, combed and cut to 1−5 cm below the previous two.
- Milled, dried and laid.
Useful recommendations
There are several recommendations that should be considered when thinking about how to trim the bangs yourself:
- It is necessary to remember about the difference between wet and dry strands. Wet hair seems to be longer, so they are cut a couple of millimeters lower. If this rule is not adhered to - the haircut may be slightly shorter.
- In order not to violate the cutting line, do not overstretch the strand too much.
- In order not to interfere with the extra they must be removed. This is also advisable, since there is a risk that you accidentally cut them off.
- You do not need to use professional scissors, you can replace them with regular ones, which you will use only for cutting.
Using the above techniques, you can give bangs any shape. The main thing is to choose the right one and follow the recommendations step by step.
Face shape selection
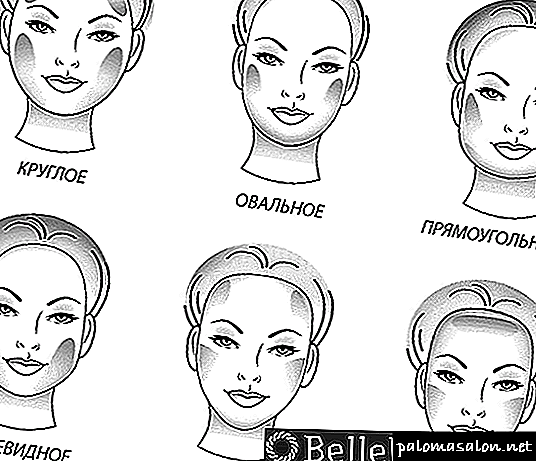 Any woman knows her face shape from the moment she becomes interested in make-up and hairstyles.
Bangs will help make it visually thinner or, conversely, open, if the features are small. Details:
- A childishly round face accepts any options - from thick to filleted oblique strands up to the chin. It is only important not to make the form wider than the temporal areas, otherwise this person will give the impression of being complete.
- The oval face is universal. He will suit short and thick bangs, long and slanting. However, you should not make symmetrical long strands around the edges to the chin - they are even more elongated shape.
- Square face. The task to soften the chin hardness, therefore, asymmetry is required. Fit oblique strand, leaving the total mass of hair.
- Triangular shape. A person accepts thick brow bangs, laid ideally smooth wave. If the hair thickness does not differ, then the strand is slightly wound and combed, creating the necessary volume.
- Small facial features need open space. Ideal to make a short bangs with torn strands of asymmetric length.
- It is not necessary to hide wide or high cheekbones, but if their owner is dissatisfied with the form, then the average profiled bangs are what you need.
What matters is the hair itself - the type of hair. Curly hair will not give the owner of a direct effect, it is only once to pass in the humid air. Requires maximum fixing styling. Thin and sparse hair also cannot boast of any form of bangs.
 To somehow get the effect of density, they must be collected in volume from the top of the head or even from the neck
How to make bangs yourself - three options for haircuts
Many of the representatives of the beautiful half of humanity in their youth more than once had to trim the ends of their hair or bangs on their own. And if with the first the bobble was not visible - especially on long hair, then with the second poor handwritten result caused panic horror - it was necessary to correct the situation immediately. Now with detailed instructions to cope with the task much easier. Today we will take a master class in this burning question - how to cut your fringe with your own hands.
Hair cut with your own hands
Tools to create bangs at home
First of all it is scissors. It is better if they are professional. Otherwise, dressmakers or paper-cutting create a stylish image will not work. Except them:
- Milling scissors. They will help to make thick bangs less often, create torn edges, play with different lengths on parts of the face.
- Comb double sided. One part with rare teeth, the other - with frequent.
- Clamps, crabs.
- Fixation tools.
This is the necessary minimum for self-image creation. Before starting the experiment, you should carefully examine your own bangs - perhaps the new styling will save you from the need to change the image radically, with the help of tools.
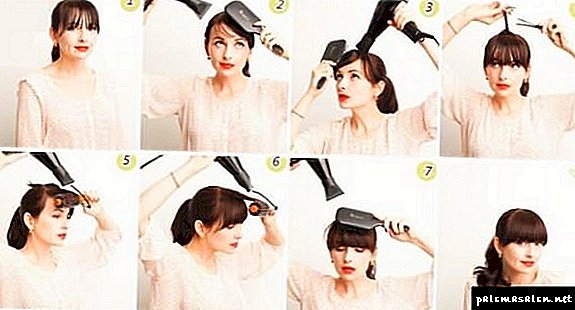
Bangs using ironing
- Comb select the desired volume of hair. To do this, separate the strands in the middle.
- The total mass is divided into 2–3 parts, if the fringe is thick. So, a small volume is easier to straighten.
- Smoothing starts from the lower layers, gradually pulling all the strands, clamping them with a flat iron. If you slightly cut the movement to the edge, you get a slightly rounded shape. It lies more naturally than absolutely straight.
Do bangs without trimming hair
- From the total weight of the hair bangs on the sides are separated parts. Their length should be up to the chin.
- The middle is stabbed back with a decorative clip.
- Selected strands are smoothed with tongs, rounding under the chin.
The effect of the elongated face is provided
Wool and perm
- The steep bun has faded from fashion since the days of Balzaminov. Therefore, small curlers postpone. Use large or the same irons.
- On curlers wrap all the planned volume of bangs. Before fixing it moistened with water. After dried with a hairdryer. Having rolled up hair curlers, a little lightly combed the mass at the roots and smoothed it over - the fringe for the square is ready.
- Iron mass rounded from the roots. It is important to keep the same movements in order to achieve an even position of each strand. Next, bouffant and styling.
Bangs are smooth, spiky, soft, waves. This is achieved with the help of styling tools. Experiments are required before deciding to cut hair.
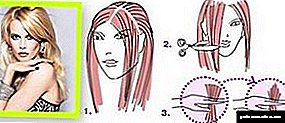
Direct: short or long
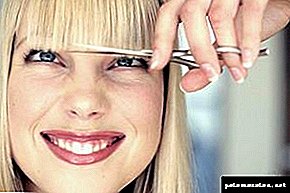
First, separate the desired mass of hair from the main. Then select the control strand - it is usually the lowest. Next, determine its length. Now, strongly pulling off the hair, cut off the excess.
Strongly pulling off the hair, cut off the excess
The remaining strands are leveled at the control. Smooth bangs ready, it remains to lay.
Slanting or sideways
Volume, like the direct variant, is allocated forward.
Volume, like the direct variant, is allocated forward.
The lower control part is clipped from the bottom of the chin or cheek to the forehead along an oblique line.
Next, do the same with other strands. The work is finished - lay the bangs.
Secrets of skill
She, in her time, became a real symbol of the sexual revolution. And in principle, this attribute hairstyle does not lose its relevance to this day. Stylists set and change only certain trends. For example, in 2006, at the peak of fashion was oblique bangs. She was quickly replaced by a “ragged” version, and later every self-respecting girl wore a bushy and dense straight bangs that covered her eyebrows.
Unfortunately, this part of the installation is not for every woman. But if you are sure that you will have to face it, we will tell you how to make a bang yourself, at home.
Of course, if you banally straighten a strand, separate it from the rest of the hair and roughly cut it with stationery scissors, nothing good or attractive will come of your hairstyle. But if you show due attention and accuracy, beautiful bangs can be cut on your own, without the help of masters from the beauty salon.
How to make a slanting or straight bang at home? To do this, you need to calculate certain parameters of the hair, zone the head and follow some beauty rules. If you neglect the latter, your new hairstyle may become for you not an ornament, but an enhancer of the appearance of aesthetic imperfections.
New haircut with your own hands: is it possible?
First of all, you will have to determine whether the haircut is in principle. If you once wore it, and you know for sure that it will not spoil your appearance, feel free to get down to business. But you should also try on different "styles" bangs. To do this, there are special computer programs and specific descriptions of hairstyles for certain types of appearance and facial ovals.
Let's take a closer look at what these elements of hairstyle are in essence:
Constructive element. In this case, it is cut during a general haircut. The bang is practically not separated from the bulk of the hair and is in harmony with it. Strangely enough, it is the easiest way to cope with such a bang yourself. If it grows and loses its attractiveness, you can only mark the line of the edging and gently cut it. No further manipulations with this styling attribute are required,
Independent item. This option contrasts markedly with the bulk of the hair. It can be long or short, thick or thin, slanting or even. Its appearance does not depend on the length of the hair - for example, it may look like a pin-up (for example, like Betty Page), and the curls will be long. Its type also does not depend on the structure of the hair: bangs can be perfectly straight and advantageous to harmonize with smooth waves or playful African curls.
For homemade haircuts, we recommend that you prefer the second option. If you have already stopped on it, it is important to clarify the main technical characteristics of the short part of your future hairstyle, namely, its width and length.
The width of the bangs is the same distance that runs horizontally from one to the second convex side of the forehead. Consider that this parameter strongly influences the perception of the face contour, therefore, if you are not the happy owner of the coveted “oval”, you should contact the hairdresser for advice and clear instructions on this matter.
After you have decided on the length of your future bangs, it is important to separate it from the main mass of hair with a U-shaped, triangular or parallel growth in parting. The length affects the perception of the shape and natural "gravity" of the face is not less than the width.
For example, girls with miniature heart-shaped faces will never get a haircut element that takes up half the space of the entire face.
Try to follow all the basic rules for selecting hairstyles so that your newly acquired hair detail does not destroy your entire luxurious image. If you are 100% sure of the correctness of your decision - let's move on to the technical process.
Do haircut step by step
Some people tend not to trust hairdressers in principle. Usually, this category includes those people who are not lucky to meet with the unfortunate masters, after which visits to the beauty salon became for them something even more alarming and scary than the reception of the dentist. If you belong to this group of people, you really should better fix your own styling.
If among your acquaintances you have a really proven master, it is better to contact him for the correction of hair - in this case you will have a guarantee that the new haircut will not spoil you for sure.
The simplest thing in your current venture is the formation of straight bangs. Her haircut is really no problem for you. If your choice fell on oblique or torn bangs, here you will have to not only “sweat”, but also to arm yourself with specific tools that are not in every house.
So, the first thing you have to do is designate the width of the future haircut detail. Usually it is selected depending on the natural structure and width of the forehead. Separate the bangs from the rest of the mass of curls with a U-shaped or triangular parting. Let's open you a little secret: in the second case, the styling will look much more advantageous.
Now you need to arm yourself with the following tools:
- Hairdressing scissors with a straight blade,
- A filler tool (if you want the border to be ragged and a little careless),
- Comb with frequent fine teeth,
- Special clamps
- Spray bottle with normal warm water.
By the way, among the hairdressers themselves, there are still debates about whether or not the hair to work on - dry or wet. In fact, the only true option does not exist here.
Do as it is convenient to you personally. We would advise you to do the most haircut on wet hair, and then dry them and adjust the resulting item hairstyle.
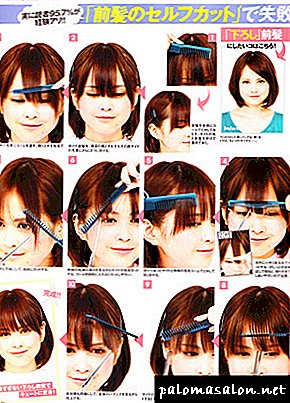
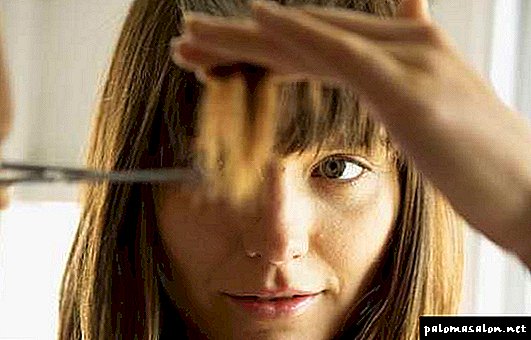
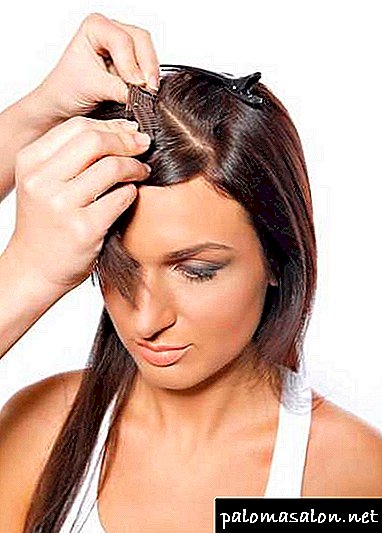
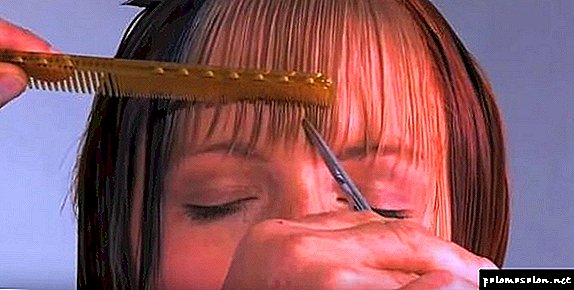
Getting Started:
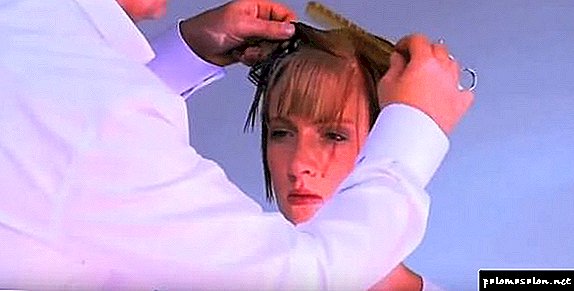
- Separate the bangs from the rest of the curls and secure their side parts with clips so that they do not accidentally fall under the cutting object,
- Your hair should be slightly damp, so use a spray bottle, but do not soak it thoroughly with water. A prerequisite - clean the head. Perform all actions only on the day when you washed your hair,
- Depending on the length, conditionally divide the hair into three strands. First, the lower strand will be the one on which the remaining zones will be oriented. By the way, it is better to make it quite long. First, it is better to trim, than to suffer, that the clipped element turned out to be too short, and secondly, it should be understood that when drying and styling your bangs will rise a centimeter up,
- So, cut the bangs, starting with the guide strand,
- Now separate the next strand (approximately 0.7 cm from the guide) and cut it off. Do manipulations with all strands. Now dry your hair and cut off all the excess,
- Enjoy the result!
How to make a slanting bang?
Here you need a little more skill and attention:
- This option is the most interesting in its style, but the girls rarely ask how beautiful it is to make bangs on its side, because they are afraid of making a mistake and spoiling everything. If you have enough courage, start with the usual wetting curls,
- Separate the work area with a triangular parting
- Select the guide strand again, but, unlike the first option, it should be shorter than all the others,
- The important point - you need to know exactly how your hair style element will look like in the end! Set a photo from the magazine in front of you to focus on it directly in the process of cutting,
- Now cut the hair in the direction to the side. You can do this in one motion, or scrupulously cut each strand with thin scissors,
- Next profile the edging. To do this, you need to know how to properly make a torn bang. And do not apply such actions in relation to curly or naughty hair,
- Again we complete the entire process of drying and styling.
If you are wondering how you can make oblique bangs from straight bangs, you need to grow your hair to such a length that would coincide with your idea of the ideal "length" of the future element of the hairstyle.
When this happens, follow the rules listed above and the steps for creating oblique bangs. Be beautiful and original in your personal image!
Torn or rounded
This effect is achieved by milling scissors. First, I model a slant or straight shape. Then, holding the scissors strictly vertically, trim the tips.
 Depth or height vary, resulting in different effects.
It is worth remembering that independent work for the first time will not give the desired effect - there is no experience. If the owner of the hair is frightening, then the right decision - the road to the salon to the master. Already there you will create strands of dreams.
Bang without cutting the hair - dramatic changes without drastic measures
Sooner or later, everyone wants change, especially women. Especially in the wardrobe or appearance. And what to do with such an interesting this time? Make a short haircut - sorry for the hair. Repaint in red? Change, of course, I want, but not so much. Make a bang? What if he gets bored after a couple of months, then wait until he grows up, and caring for her takes extra time. Although the idea of a bang still does not give rest. And it is at such moments that the most brilliant thoughts are born. Bangs can be made without trimming the hair, especially if they are long.
Change without scissors at home
All girls know that long hair is not only beautiful, but also almost endless possibilities for experiments, of course, if your hands grow from the right places. Without hesitation, bangs on a long head of hair are cut only by very brave girls. Those who do not dare to take such cardinal steps come up with very interesting alternative solutions, creating hairstyles with fake bangs. The easiest option for good hair length is as follows:
- We collect hair in a high tail and fix it with a rubber band,
- We start to twist it in a bun, but we do it so that the ends of the hair will end up on our forehead,
- Bundle fasten studs or stealth. And the ends lay out in the form of bangs. You can make it on one side, oblique, and slightly twist the ends.
If the length of the hair does not allow twisting bunches and tails, then you can collect the hair at the crown, put them in the form of "shells", but again, we don’t hide the ends, but form into bangs. To create a border between the bulk of the hair and bangs, you can use a scarf, a bandage or a hoop. Behind the hair, you can also make a spikelet, braiding it from the neck to the crown. This will make the styling even more original.
Inventions beauty industry
Demand always generates supply. And the eternal question of women "to cut the bang or not" resulted in the appearance of invoice bangs. While not many women decide on its use, but in fact it has a lot of advantages:
- creates additional volume at the crown,
- without contact with the scalp, less polluted, respectively, and wash less frequently,
- staining stays for a long time, if such was eaten, so that the fringe coincided in color with the bulk of the hair,
- with the right care "live" 2-3 years,
- very easily and securely fastened with three clamps,
- once fed up, it just folds up in a box. Wait until there is a need to grow.
Blanks do not look very attractive, but on the head the effect of "wow" is provided. The hair for making is used naturally natural. Initially, it is presented in two colors - for blondes and brunettes. But it can be dyed with the bulk of the hair, which adds to the image of naturalness and naturalness.
If there is no desire to paint the native head of hair, then you can paint over only the bangs. In general, it is possible to do everything with it, as with the hair on the head, that is, to color, color, armor. But with lightening it is worth being neat, for the third time the quality of the hair will noticeably deteriorate. After staining, the bangs are trimmed to the desired shape. And here are some more advantages. For the first time, it can be made elongated with a scythe, then cut into a flat or, dividing with a flat part, put on two sides. The fake bang will hide regrown hairs that have not been dyed on time and are not very “fresh” strands. In a word, a scrap of solid advantage.
So you can drastically change without drastic measures. Can be at home or salon conditions. The main desire.
Short hair without haircut: find out how!
Want a change? It is not necessary to run to the hairdresser to cut off hair or bangs, because you can make a fake hairstyle! Sometimes you can easily portray that your hair is shorter, and in some cases even longer than it actually is! Interested? See how easy it is!
Haircut bob? No - illusion!
Suddenly wanted to shorten the hair? Sometimes this desire rolls on every long-haired girl. Stop and take a breath, there is no need to cut curls, if you can just wrap them! There are plenty of options, we have chosen the best for you. Just remember that to create a fake bean or a square, it is better to pre-tighten the hair with a curling iron (for greater likelihood).
If you have not really long hair, then it's even easier for you!
You can use the pins, deftly twisting the individual strands.
Or just remove the "extra" hair in the tail.
And the owners of light hair are lucky, they just have to twist the curls into bagels and fix them with invisible hair.
And having made two tails and a little bouffant (you don't want to ruin your hair?), You can get a real retro styling!
Owners of long curls better braid pigtail for reliability!
Do you like to make bunches? Then use it here!
Straighten your hair with an iron and become a real retro diva with a few barrettes!
Fake hairstyles: hide bangs
Tired of bangs that descend to the forehead, but there is no time to grow it? Don't worry, it's easy to hide! To do this, you also need a curling iron and varnish!
And sometimes beautiful accessories will come in handy.
Even if you have a very thick bang, believe me, your case is not hopeless!
And you can hide the bangs in a trendy mini-bun!
Or braid a pigtail.
If your fringe has grown back, then there are plenty of options for you, choose any!
Well, if you don’t want to bother with the styling at all, then just sweep the bored bang back!
Make a bang without scissors for one day! Sly equipment for experiments with long hair
Everyone knows that girls love change. Someone likes to change and change the space around themselves very often, someone rarely. But if nothing changes in the life of a girl for a long time, she starts to feel bored and sad. And boredom and sadness are absolutely contraindicated for the female sex :)
Therefore, we sometimes need albeit small ones, but changes! But what to change and how? There are many options. You can make minor or major repairs, buy a new dress or change hair color. And you can also make a bang, if you do not have it. And it does not need to contact a hairdresser. You can create it yourself and without scissors! Do not believe? Then this article is for you.
In it we will talk about the technique of creating an interesting hairstyle with bangs, which can be done without cutting the hair with scissors.
For this we need:
- Studs.
- Great hairbrush.
- Invisibles (hair color).
- Round forceps of large diameter (curling iron).
- Rectifier (iron).
- Thermal protective agent (if available).
- Elastic.
- Varnish
Creation technique
- Make a vertical parting on the side of the crown.
- Carefully comb all the hair.
- We process all curls with a thermoprotectant along the entire length.
- With the help ironing process the lower zone of all the hair.
- Then we collect a high tail on the top, helping ourselves with a comb.
- Fix it with an elastic band and stealth at the base.
- Move it forward and again carefully comb it out.
- Now we raise it to the level, how long you want your bangs without scissors.
- And fix the top, on the top of the invisible cross with both sides.
- We twist the remaining loop of the tail and make a high beam from it.
- Secure it with studs or stealth.
- The resulting bangs are divided into strands and curled curling.
- Then beautifully straighten and stack bangs with your fingers.
- Fix our resulting hair with lacquer.
Our cool bangs without scissors for one day is ready! As you can see, everything is very simple! As a result, you will get an absolute change in the everyday image. If you decide on this experiment, write about it in the comments to the article. Let's help each other change.
Features oblique bangs
Oblique bangs can be both short and long. It is selected primarily on the shape of the face and on the hair in general. For example, a ragged slanting fringe may not fit a straight, literally conservative square simply because of the absurdity of the combination. For long curly hair long bangs perfectly fit, because it creates the effect of a certain continuation of hair, but a short one will look mediocre with such hair.
Many believe that you can slightly grow straight bangs, combing her set - and oblique bangs ready. Yes, oblique bangs will be, but beautiful and neat - it is unlikely, because there is a lot of hair, they will surely stick together in one shock, and this will be noticeable. Also, oblique bangs usually do not differ in such incredible thickness, which is obtained when combing straight lines to the side. In addition, you will probably have to use fixing agents for hair - varnish, spray, mousse, since the hair is unlikely to lie obediently like you did it. They are already accustomed to another form. The abundance of fixative will give the effect of oily hair.
Therefore, it is better to decide what kind of bang you want - straight or oblique, and not to make one and think that you have “two in one”.
By the way, in comparison with straight bangs, oblique has a huge advantage: it does not need to be adjusted so often. This is due to the fact that it will not look sloppy if its length exceeds one or two centimeters due to the fact that you did not have time to go to the hairdresser. However, the exact size depends on the type of oblique bangs. In the case of direct, the situation is different: as soon as it begins to crawl into the eyes, it is time to cut it, otherwise it is not only inconvenient, but also ugly.

How to lay oblique bangs
It is not enough to cut the oblique bang, you also need to learn how to lay it correctly. If the oblique bangs are very short, then their laying is usually easy: using a hair dryer and a suitable comb. Sometimes you can use the iron with narrow plates.
But for a long bangs iron can be a really suitable tool. Straightened with his help strands are smooth and smooth, have a beautiful glossy sheen. If desired, you can slightly twist the ends inside.
And if the oblique bangs are so long that they are actually included in the bulk of the hair, then you can use both an iron and a hair dryer with a comb, depending on the desired result. The effect will be equally charming.
It is also important not to forget to adjust the fringe in time: trim when it grows enough. This can be done independently, but you can contact the master, but self-correction is not as simple as it seems at first glance.
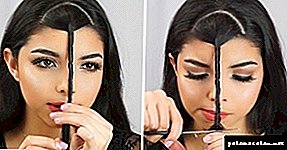
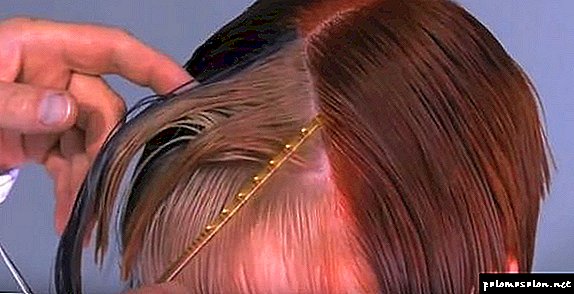
How to separate the zone bangs
Before you start a haircut, it is necessary to determine exactly where the bangs will be, as well as remove the bulk of the hair away from the place of work with scissors. To separate the zone of future bangs usually use any of the following methods:
- The parting resembling the letter P. In this case, the line will be even, and the bang will fall evenly. This type of parting does not suit girls with a round face.
- Triangular. In this case, the bangs will have a kind of "top".
When zones of future bangs are separated, the rest of the hair must be gathered into a ponytail or fastened with hairpins, invisible haircuts or hairdressing clips. So they do not accidentally fall under the scissors.
Length of oblique bangs can be any. Before the haircut, you need to slightly moisturize the bangs, but if you are cutting your own hair for the first time, you can skip this step so as not to make any mistakes. For beginners, it is better to work with clean, dry hair.
Bang must be well combed and in the process of cutting periodically comb, so that it turned out neat in the end.
From straight bangs to slanting
To understand how to make a slanting bang at home, if you already have a straight line, you just need to take a closer look at it. You are lucky: the bang line is already there, you can not change it. Just change the angle. You can wait until the straight fringe grows enough to experiment with it, or you can cut it straight away on the basis of what it is, but it is risky.
So, how to make a slant from straight bangs:
- Determine which side the bang will fall on.
- If it is long enough, position the scissors at a 45-degree angle to the hair and start cutting. The beginning of oblique bangs should be near the eyebrow.
- Cut off little by little in order to have time to adjust the bangs in time.
- If straight bangs are short, and you want a slanting short one too, then keep in mind that this is very difficult to do. But if you take the risk, then the principle of action is the same, but start cutting not from the eyebrow, but above.
Haircut long oblique bangs on their own
Let's talk about how to make a slanting bang, if you hadn’t had any before. The option to make a long bang is optimal for a novice hairdresser, as the practice of many girls has shown that it is the easiest to do it. The algorithm of actions is the same as described in the previous section, but first you need to properly separate the bang zone, otherwise, even ideally trimmed, it will have a rather unpleasant appearance.
How to make a slanting bang, photos from different magazines, newspapers and the Internet can tell a lot better. Take a good look at the illustrations before starting the haircut, but note that the scheme is slightly different from the final result.
How to make a slanting torn bang
As an example, we will talk about the original method of cutting oblique torn bangs. The result will be unpredictable, but in most cases - beautiful.
- Separate the area bangs, comb your hair.
- Twist them into a loose, lightweight harness. The harness should be located approximately where the bang, in theory, should end.
- Cut off the excess hair with scissors. When you let go of the harness, it will unwind, and you will see that you have obtained oblique asymmetrical bangs.
This method involves either the effect of surprise (attention: you may not like it!), Or preliminary training on volunteers or special hairdressing mannequins. The final result depends on how exactly you twisted the harness, how it was held and many other factors. You can also try to cut the bangs on yourself, but with a margin so that you can adjust if necessary.
Torn fringe: long, but thoughtful
Make oblique bangs can be not only in the form of a surprise, but also so that it was clear what exactly happens. You can get the effect of torn strands with the right actions with scissors.
Trim the slanting bang to the length you want. Then place the scissors blades parallel to the growth of the hair (in other words, almost vertically) and with sharp movements walk the bangs. The main thing is not to overdo it. Since such movements you cut off part of the hair, and if you cut off too much, you will become the owner of not torn, but bald bangs.
Now you know how to make a slanting bang. And nevertheless, preliminary training will not prevent.
Recommendations for self-haircut
To make a slanting bang yourself, you need to follow these guidelines:
- Use only high-quality scissors, ideally professional. If you do not have them, it is better to purchase, especially if you plan to adjust the bangs further on your own.
- If you wet your hair before cutting, then keep in mind that you need to leave a little longer than it seems at first glance. When drying the hair a little "bounce" because dry bangs will be shorter than wet.
- Trim the hair so that it is possible to correct your mistakes. There must be a certain stock.
- Separate only the bangs, collect the rest of the hair in the tail or fix the clips so that they do not fall under the scissors.
- In the room where you cut your hair, there must be excellent lighting, and you have a beautiful large mirror.
- Since it is very difficult to make long, slanting bangs beautifully on your own, it is recommended to resort to self-cutting only in exceptional cases. Or if you really know how to cut. But it should be remembered that the process of cutting hair on yourself is different from cutting others.
Precautionary measures
How to make a slanting bang, has already been described in detail. It is also worth mentioning how not to spoil your hair and mood completely. The following recommendations should be considered:
- Cut the bangs a bit to evaluate what you are doing in the process.
- Scissors must be of high quality. Even if you have professional hair salons, make sure their blades are not stupid. Much depends on the quality of the scissors.
- Try not to drop these scissors anywhere (especially on your leg) and do not direct the blades to your face. This is a banal safety technique. Keep it, even if you do not get bangs, and you are nervous because of this.
- Keep in mind that wet hair is slightly longer than dry hair.
- Curly hair should be trimmed with this in mind. Also, make sure in advance whether you can gently stack the bangs on curly hair.
Finally
Oblique bangs - one of the most fashionable options. It is versatile and convenient, has several varieties, can be of almost any length. You can learn to cut it yourself at home, and adjust it the same way. However, the ideal option would be to contact a hairdresser, because with the help of a specialist the bang will turn out really successful.
Chainsaw, scythe and plane or how to cut bangs (60 photos) at home
A bang is an amazing element of a hairstyle in its own way, simple strands on a person are able to adjust its shape, give an individuality to the image, and in some cases become the first violin in a haircut. On how to properly cut the bang itself, and I will talk today.
Bangs - the easiest and fastest way to visually correct face
Professional scissors: why it matters
Before we begin to review the schemes, techniques and advice, let me remind you that high-quality hair cut only half depends on the skill of the hairdresser. The second half, which determines the outcome and success of a haircut - a quality tool. Yes, professional sharp scissors, which are used exclusively for cutting hair, should be your companions.
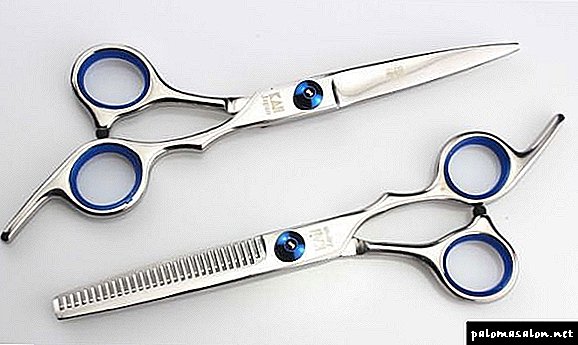
The extent to which the result will meet the expectations depends on the quality of the tool, from personal experience I do not recommend purchasing scissors, the price of which is lower than 2000 rubles.
Why do I focus on the instrument? Household scissors, which were previously used for cutting out applications with a child or worse, do not cut a hair as a kitchen utensil, but tear it off. As a result, after 2-3 weeks, it begins to stratify intensively.
Required element haircuts
Bangs as a must-have haircut
Bangs as an element of hair is quite common, especially when it comes to haircuts such as "ladder" or "cascade." The design of the facial strands is carried out along with the cutting of the entire mass of hair, then the fringe is combed in the chosen direction.
I would not advise those who do not have minimal hairdressing knowledge and experience to undertake such a complicated manipulation with hair. Why? The fact is that careful study requires not only the front strands and it is likely that the result will be far from waiting, the bangs will not look like a single whole with the hairdo, and remaining separate strands.
This result is extremely unattractive looks on haircuts pixie, sesson, ladder and cascade.
Separate item haircut
Bangs as a separate element of the haircut
This is a completely different matter, in cutting such a bang you are limited only by your own imagination. Being an independent element, the bang does not make demands on the length of the remaining mass of hair, and its shape is determined solely by the type of person and personal preferences.
In addition to the length and shape of the facial strands, it is important to determine the type of horizontal parting that will separate them from the main hairstyle. Your choice can be triangular, parallel or U-shaped parting.
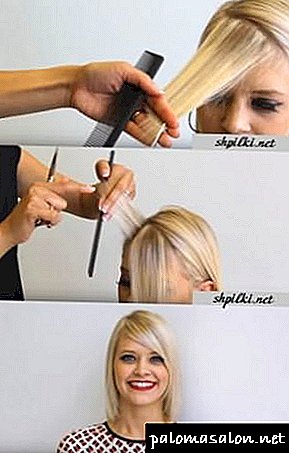
Straight bangs
Straight bangs - a classic version, which I advise you to pay attention to the owners of a little curly and thin hair.
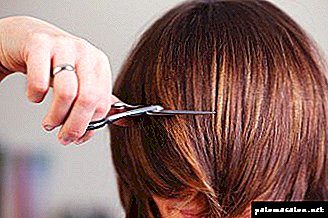
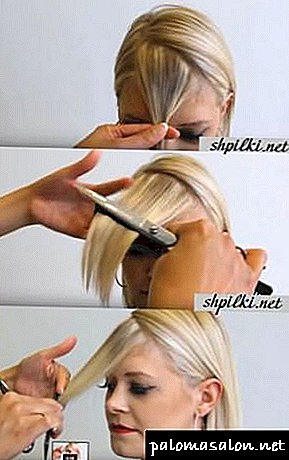
Dividing the bangs into layers for your own haircut
- The area of the bangs is parted, the remaining hair is fastened with clips.
- I trim the first strand (control) at the selected level. I separate the next one, receding 1 cm, and cut it in a perpendicular raised up position. I take the first strand as a guide.
Lower layer trim
- Similarly, I spend the study throughout the thickness.
- The final stage (optional) - filirovka. I spend the method of vystriganiya triangles, separating the strands across the width of the bangs every 0.8 cm.
Branch top bangs for haircuts
Straight lush bangs
- The hair is separated by triangular or rectangular parting.
- With a horizontal parting, I single out the first strand and cut it off at the chosen level.
- The next strand is separated in the same way as the straight bangs.
Haircut and styling thick bangs
Note! The two schemes described above are almost the same. But it is important to understand that the second version of the bang, due to its density, is not recommended for owners of a round face, as well as for those who have small and thin features.
Oblique chelochka
- I separate the strands with a triangular parting, fix the rest of the hair mass with clips.
- Before you cut the bang yourself, wet it with water and carefully comb it. In the implementation of this scheme, it is extremely important that a single-row comb with the most frequent teeth be used in the work.
Preparing for a haircut
- In this case, the entire mass of hair, which is destined to become a chelochek, will be cut at the same time. To do this, clamp the hair at a selected angle, the tips located under the fingers, gently cut it off.
Note! Remember that hair after drying always becomes shorter. This fact is particularly relevant when cutting short oblique milled bangs, the upper edge of which does not go beyond 2-3 cm.
The process of shearing oblique bangs to the side